
In the Original Course View, you can easily navigate, provide content, edit items, and change options that affect how users interact with the interface.
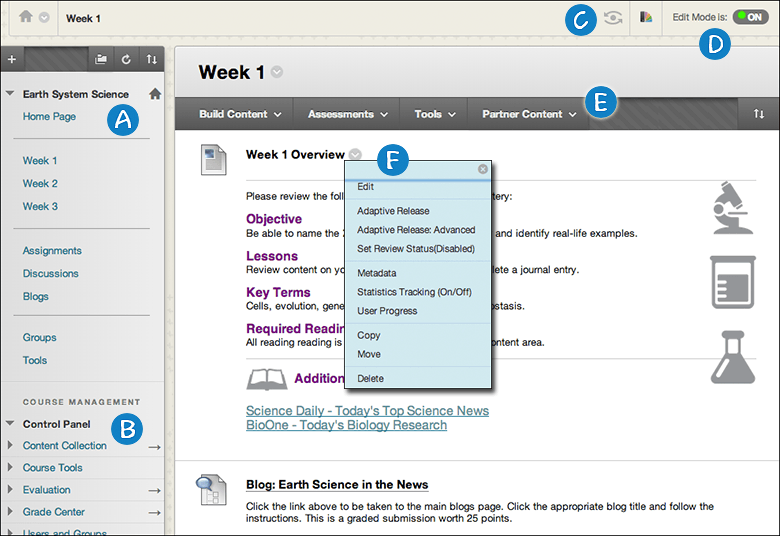
(A) Course menu: Users’ access point for all course content. You control which links appear on the course menu.
(B) Control Panel: The area after the course menu is your access point for course management functions, such as course style, course tools, and users. Students don’t see the Control Panel.
(C) Student preview: You can review course content and validate course behaviors from a student’s perspective. You’re logged in with a student account—the preview user account—and enrolled in the current course.
(D) Edit Mode: When Edit Mode is ON, all the instructor functions appear, such as Build Content or the appearance of menus. When Edit Mode is OFF, all instructor functions are hidden. The Edit Mode function appears to users with a role of instructor, teaching assistant, course builder, and administrator.
(E) Functions: In one or more rows above the content, access page-level functions such as Build Content, Search, Delete, and Upload. The functions change based on where you are in your course.
(F) Menus: An Options Menu icon appears for components with menus, such as content items, course menu links, or Grade Center columns. The options in the menu vary based on the component.
Video: Getting Oriented with Blackboard Learn
Course Menu
The course menu appears on the left side of your course window and is the cornerstone for the organization and navigation of your course. You create links on the course menu to present tools and materials to users. You can customize its appearance and order the links. The course menu appears in a list view, which displays only the top level of course materials. You can choose buttons or text for your links.
Create a Link on the Course Menu
Create an uncluttered course menu to maintain efficient navigation for your users, and try to limit the number of links included in the course menu. Use content areas to hold related items and give your course organization and structure.

- Select the Add Menu Item icon above the course menu to access the menu.
- Select the type of content to create and type a name. Complete any other required text boxes, such as URL for Web Link.
- Select the Available to Users check box if you’re ready for students to see it. You can create content ahead of time, hide the link, and then show the link at the appropriate time.
- Select Submit. A link to the new content appears on the course menu.
Reorder and Manage Course Menu Links
You can organize and rename the course menu links.

Use the drag-and-drop function to reorder course menu links or use the keyboard accessible reordering tool to reorder the links. Access a link’s menu and select Rename to change its title. Select Hide Link to make it unavailable to students. Select Show Link to make it available to students. If you Delete a content area, all content items within it are also permanently deleted. This action is final. When Edit Mode is ON, an unavailable link title appears with the This link is hidden from students icon. Students don’t see the link on the course menu.
Control Panel
The Control Panel appears below the course menu and provides access to all course administration. The table describes each section.

The Control Panel is only available if you have one of these course roles:
Instructor
Teaching Assistant
Grader
Course Builder
Administrator